m (→Unlockable Characters: replaced: Hero]] → Hero (class)|Hero]]) |
(→Floor 1: added cheat, works and has been tested.) Tag: Visual edit |
||
| (6 intermediate revisions by 6 users not shown) | |||
| Line 4: | Line 4: | ||
==Unlockable Characters== |
==Unlockable Characters== |
||
| + | These characters are only unlockable during [[Creature Campaign]]. |
||
| + | |||
[[Caellach]] - lv.12 [[Hero (class)|Hero]]: Clear the 3rd floor |
[[Caellach]] - lv.12 [[Hero (class)|Hero]]: Clear the 3rd floor |
||
*Items: [[Silver Axe]], [[Tomahawk]], [[Hoplon Guard]] |
*Items: [[Silver Axe]], [[Tomahawk]], [[Hoplon Guard]] |
||
| Line 10: | Line 12: | ||
*Items: [[Runesword]], [[Silver Lance]], [[Red Gem]] |
*Items: [[Runesword]], [[Silver Lance]], [[Red Gem]] |
||
| − | [[Riev]] - lv.16 [[Bishop]]: Defeat 200 or more enemies in |
+ | [[Riev]] - lv.16 [[Bishop]]: Defeat 200 or more enemies in one trip. |
*Items: [[Aura]], [[Purge]], [[Blue Gem]] |
*Items: [[Aura]], [[Purge]], [[Blue Gem]] |
||
| Line 20: | Line 22: | ||
==Floors== |
==Floors== |
||
| − | Each floor contains various monsters and other items. As you progress through the |
+ | Each floor contains various monsters and other items. As you progress through the chapters, more floors are unlocked for you, meaning more profit on the trip. |
===Floor 1=== |
===Floor 1=== |
||
[[File:Valni (1).png|right|150px]] |
[[File:Valni (1).png|right|150px]] |
||
| Line 27: | Line 29: | ||
*'''Chests''': None. |
*'''Chests''': None. |
||
*'''Note''': This is a good floor for training units. |
*'''Note''': This is a good floor for training units. |
||
| + | |||
| − | {{clr}} |
||
| + | * '''Cheat''': when you enter the tower, retreat and save. re-enter the tower without moving off it, retreat, when you get to the save screen, soft reset. restart chapter and re-enter, there should be a skeleton to the left of the boss with a droppable runesword. (can repeat as manytimes as you want.){{clr}} |
||
===Floor 2=== |
===Floor 2=== |
||
| Line 57: | Line 60: | ||
*'''Units''': [[Revenant]]s, [[Bonewalker]]s, [[Entombed]]. |
*'''Units''': [[Revenant]]s, [[Bonewalker]]s, [[Entombed]]. |
||
*'''Boss''': 2 [[Entombed]]. |
*'''Boss''': 2 [[Entombed]]. |
||
| − | *'''Chests''': In the rooms opposite the bosses; top left contains [[Killer weapons]] |
+ | *'''Chests''': In the rooms opposite the bosses; top left contains [[Killer weapons]], and the bottom right contains either a [[Shine]], [[Thunder (tome)|Thunder]], [[Luna (tome)|Luna]], [[Recover (Staff)|Recover]]. Both chests have the possibility of a red or blue gem. |
| − | *'''Reinforcements''': [[Bonewalker]]s |
+ | *'''Reinforcements''': A combination of [[Bonewalker]]s and [[Revenant]]s coming from the stairs in front of the bosses, starting turn 1 for five turns. |
*'''Note''': The two bosses drop a [[Chest Key]]. |
*'''Note''': The two bosses drop a [[Chest Key]]. |
||
| Line 65: | Line 68: | ||
*'''Units''': [[Revenant]]s/[[Entombed]], [[Bonewalker]], [[Wight]]. |
*'''Units''': [[Revenant]]s/[[Entombed]], [[Bonewalker]], [[Wight]]. |
||
*'''Boss''': [[Wight]] (equipped with a [[Brave Sword]]). |
*'''Boss''': [[Wight]] (equipped with a [[Brave Sword]]). |
||
| − | *'''Chests''': Four; one in the bottom left; holding a [[Staff ]](random from the selection of [[Restore]], [[Physic]], [[Silence (staff)|Silence]], and [[Fortify]]) and three lined up on the top edge; from left to right, they contain B or C rank [[tomes]] ([[Nosferatu]] for [[Dark |
+ | *'''Chests''': Four; one in the bottom left; holding a [[Staff ]](random from the selection of [[Restore]], [[Physic]], [[Silence (staff)|Silence]], and [[Fortify]]) and three lined up on the top edge; from left to right, they contain B or C rank [[tomes]] ([[Nosferatu]] for [[Dark (magic)|Dark magic]]); [[Steel]] (plus [[Steel Blade]]) or [[Brave weapons|Brave weapons]] ; 5000 [[gold]]. |
*'''Note''': The Bonewalker near the top right corner has a Chest Key. One of the Wights will always drop a [[Steel Lance]]. The Revenant/Entombed near the top three chests will never move from its spot. The map is littered with cracked walls which are to be destroyed to advance; after the end of your turn, Bonewalkers will begin to attack some of these walls (the one top of your starting position, three west the one a little above the third wall). A Longbow will be very useful on this floor. |
*'''Note''': The Bonewalker near the top right corner has a Chest Key. One of the Wights will always drop a [[Steel Lance]]. The Revenant/Entombed near the top three chests will never move from its spot. The map is littered with cracked walls which are to be destroyed to advance; after the end of your turn, Bonewalkers will begin to attack some of these walls (the one top of your starting position, three west the one a little above the third wall). A Longbow will be very useful on this floor. |
||
| Line 81: | Line 84: | ||
*'''Boss''': [[Cyclops]] (equipped with a random axe, drops a [[stat booster|Stat Booster]] /[[Promotional Item]]). |
*'''Boss''': [[Cyclops]] (equipped with a random axe, drops a [[stat booster|Stat Booster]] /[[Promotional Item]]). |
||
*'''Chest''': One that always has a Blue Gem. |
*'''Chest''': One that always has a Blue Gem. |
||
| − | *'''Note''': After you get to the top of any one of the 6 staircases with at least one unit, a bolt of light will speed past either the far left or right stairs. Any unit caught will be dealt with 10 damage. The bolt of light |
+ | *'''Note''': After you get to the top of any one of the 6 staircases with at least one unit, a bolt of light will speed past either the far left or right stairs. Any unit caught will be dealt with 10 damage. The bolt of light alternates each turn. (left to right, right to left and so on). The Gorgon on the level has Shadowshot and Stone. |
:''See also [[Lagdou Ruins]] and [[Melkaen Coast]].'' |
:''See also [[Lagdou Ruins]] and [[Melkaen Coast]].'' |
||
Revision as of 08:07, 26 April 2020
The Tower of Valni is a location in Fire Emblem: The Sacred Stones, and formerly housed the Sacred Stone of Frelia until its destruction by Caellach and Selena. The Tower has 8 floors.
From Chapter 9 onward, the Tower of Valni is a place where the player can train characters in order to make them of a higher level, as it is filled with monsters. Beating the Tower of Valni in the Creature Campaign unlocks characters that were either bosses or NPC's in the main campaign.
Unlockable Characters
These characters are only unlockable during Creature Campaign.
Caellach - lv.12 Hero: Clear the 3rd floor
- Items: Silver Axe, Tomahawk, Hoplon Guard
Orson - lv.13 Paladin: Clear the 6th floor
- Items: Runesword, Silver Lance, Red Gem
Riev - lv.16 Bishop: Defeat 200 or more enemies in one trip.
Ismaire - lv.9 Swordmaster: Clear the 8th floor
- Items: Shamshir, Wind Sword, Master Seal
Selena - lv.11 Mage Knight: Clear the 8th floor 3 times
Floors
Each floor contains various monsters and other items. As you progress through the chapters, more floors are unlocked for you, meaning more profit on the trip.
Floor 1
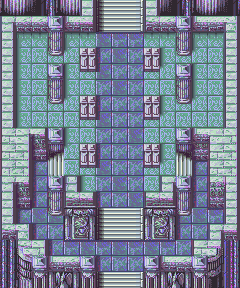
- Units: Bonewalkers, Entombed and Revenants.
- Boss: Entombed.
- Chests: None.
- Note: This is a good floor for training units.
- Cheat: when you enter the tower, retreat and save. re-enter the tower without moving off it, retreat, when you get to the save screen, soft reset. restart chapter and re-enter, there should be a skeleton to the left of the boss with a droppable runesword. (can repeat as manytimes as you want.)
Floor 2
- Units: Tarvos, Bael, Mauthe Doog, Revenants, Bonewalkers.
- Boss: Maelduin (equipped with a Tomahawk).
- Chests: None.
- Reinforcements: Any combination of 4 creatures consisting of Tarvos, Mauthe Doog, and Bael once a unit gets past the long wall to the east.
- Strategy: The main area you start in is a pain because of a thick mix of Bonewalkers armed with close-range and far-range weapons. It makes it difficult to train weak units.
Floor 3
- Units: Bael, Tarvos, Bonewalker, Revenants, Entombed, Mauthe Doog.
- Boss: Elder Bael.
- Chests: One with 3,000 gold. It is located in the top center of the map, guarded by five monsters. Proceed with caution.
- Strategy: Over half the enemies here are Bael, so magic users will come in handy here.
Floor 4
- Units: Bael, Bonewalker, Tarvos, Entombed, Mauthe Doog.
- Boss: Gwyllgi.
- Chests: None.
- Note: Forces begin split; five at the bottom and three in the middle, separated by two long corridors on the sides.
Floor 5
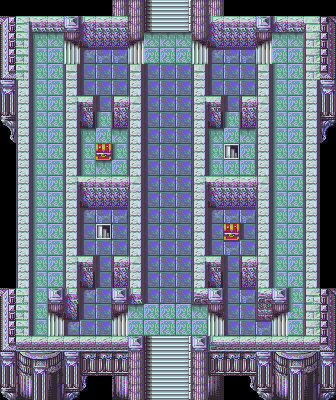
- Units: Revenants, Bonewalkers, Entombed.
- Boss: 2 Entombed.
- Chests: In the rooms opposite the bosses; top left contains Killer weapons, and the bottom right contains either a Shine, Thunder, Luna, Recover. Both chests have the possibility of a red or blue gem.
- Reinforcements: A combination of Bonewalkers and Revenants coming from the stairs in front of the bosses, starting turn 1 for five turns.
- Note: The two bosses drop a Chest Key.
Floor 6
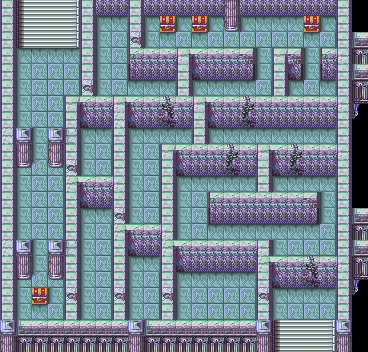
- Units: Revenants/Entombed, Bonewalker, Wight.
- Boss: Wight (equipped with a Brave Sword).
- Chests: Four; one in the bottom left; holding a Staff (random from the selection of Restore, Physic, Silence, and Fortify) and three lined up on the top edge; from left to right, they contain B or C rank tomes (Nosferatu for Dark magic); Steel (plus Steel Blade) or Brave weapons ; 5000 gold.
- Note: The Bonewalker near the top right corner has a Chest Key. One of the Wights will always drop a Steel Lance. The Revenant/Entombed near the top three chests will never move from its spot. The map is littered with cracked walls which are to be destroyed to advance; after the end of your turn, Bonewalkers will begin to attack some of these walls (the one top of your starting position, three west the one a little above the third wall). A Longbow will be very useful on this floor.
Floor 7
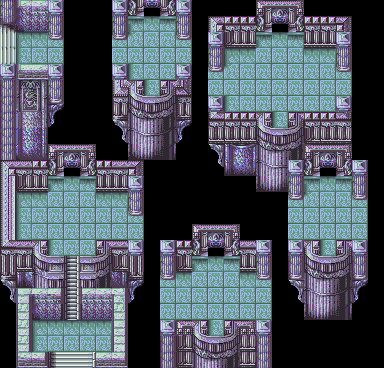
- Units: Revenants, Entombed, Bonewalker, Wight, Bael, Elder Bael, Mauthe Doog, Gwyllgi, Mogall, Arch Mogall, Gargoyle, Tarvos.
- Boss: Deathgoyle (equipped with a Javelin).
- Chests: None.
- Reinforcements: Two Gargoyles per platform for the first three platforms, enters from the fireplace-looking wall. They will spawn only when you defeat all the enemies two platforms ahead of them.
- Note: All the units that are accessible to you must be killed in order to reach the next group. Promoted enemies do not move from their spot.
Floor 8
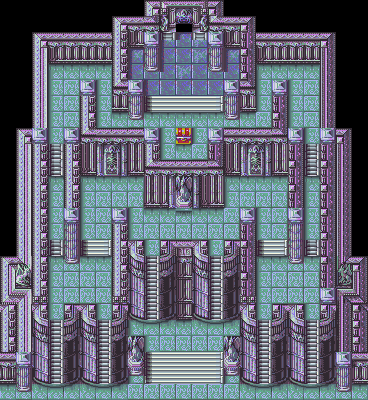
- Units: Wight, Cyclops, Gorgon.
- Boss: Cyclops (equipped with a random axe, drops a Stat Booster /Promotional Item).
- Chest: One that always has a Blue Gem.
- Note: After you get to the top of any one of the 6 staircases with at least one unit, a bolt of light will speed past either the far left or right stairs. Any unit caught will be dealt with 10 damage. The bolt of light alternates each turn. (left to right, right to left and so on). The Gorgon on the level has Shadowshot and Stone.
- See also Lagdou Ruins and Melkaen Coast.